Categories

Chocolate Cheesecake Bars | alidaskitchen.com

Chocolate Cheesecake Bars

Chocolate Cheesecake Bars from Alida's Kitchen
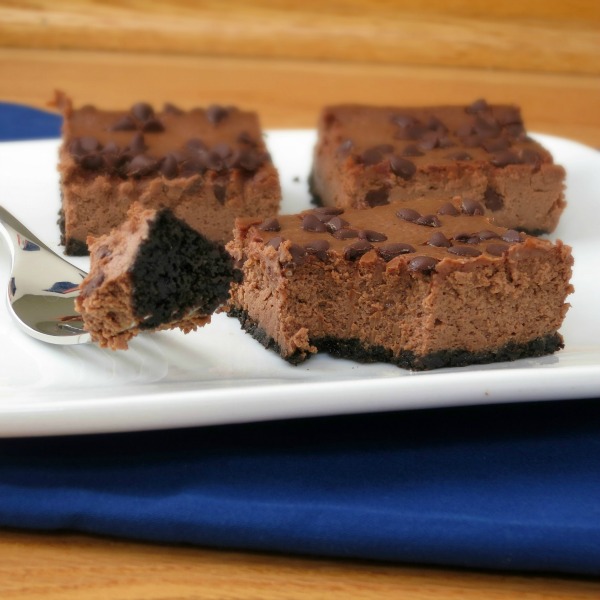
These Chocolate Cheesecake Bars are made on the lighter side!  They are chocolaty, decadent and soooo good!
It’s been a while since I’ve shared a dessert, so to make up for that, I decided you deserve some chocolate.   Not just any old chocolate though ~ Chocolate Cheesecake Bars, and they’re made on the lighter side.  Despite being made light, each bite of these Chocolate Cheesecake Bars is chocolaty, decadent and sooooo good!

The hands on work takes all of 10 minutes, which is awesome.  First you start with a simple chocolate cookie crumb crust.  Then toss the rest of the ingredients the food processor (minus the chocolate chips, which are used for topping) and process until smooth.  Pour the filling over the crust, sprinkle with chocolate chips, and bake.  Easy peasy!  After baking, just chill the bars for a few hours, or overnight.  Cut into bars and enjoy!

Chocolate Cheesecake Bars
 
Ingredients
  • Cooking spray
  • 1 cup chocolate sandwich cookie crumbs (such as Oreos) - approx. 15 cookies
  • 2 tablespoons butter, melted (I used light butter)
  • 1 package (8 ounces) reduced-fat cream cheese
  • 1 cup reduced-fat sour cream
  • ⅓ cup unsweetened cocoa powder
  • 2 tablespoons cornstarch
  • ¾ cup granulated sugar
  • 1 teaspoon vanilla extract
  • 1 egg
  • 1 egg white
  • ⅓ cup semisweet chocolate chips (I used miniature)
Instructions
  1. Preheat oven to 325 degrees. Spray a 8-inch baking pan with cooking spray. Line pan with 2 strips of parchment (or waxed paper) set cross-wise in the pan. Spray with cooking spray again and set aside.
  2. In a small bowl, stir cookie crumbs and melted butter until moistened. Using waxed paper, press cookie crumbs into the bottom of prepared pan.
  3. In a food processor, blend cream cheese and sour cream until smooth. Add cocoa, cornstarch, sugar, vanilla, egg and egg white and process until smooth. Pour into pan and sprinkle with chocolate chips.
  4. Bake for 35 to 40 minutes, or until set (be careful not to over bake). Cool in pan on wire rack for 1 hour. Cover and refrigerate for at least 2 hours to overnight.
Notes
Notes: I made cookie crumbs by whizzing the Oreos in the food processor and then proceeded to make the filling - no need to wash in between. If you're gluten free, you can use gluten free cookies for the crumbs.

Adapted from Everyday Food, January/February, 2004

Chocolate Cheesecake Bars | alidaskitchen.com


Lighter Lemon Cake

Right now,  I am listening to the sounds of our snowplow service plowing our driveway. Again.  We got 5 inches of snow yesterday and are projected to get at least another inch today.  It’s mid-late April.  Yikes!  So while I had a different recipe to share with you today, I thought we all could use a little sunshine, well…for a variety of reasons these days. Nothing says sunshine quite like a lemon dessert, and this Lighter Lemon Cake will definitely brighten any day.

Back in February, I shared Adam’s Baseball Birthday cake, and the flavor of that cake was this Lighter Lemon Cake.  Lighter Lemon Cake has become my ‘go-to’ lemon cake.  It has a generous amount of lemon zest and juice, yielding a vibrant lemon flavor, and the buttermilk helps yield a nice, moist crumb.  The lemon zest and juice in the frosting gives an extra lemon boost, which is bright and delicious.  If you like lemon, you’ll love this cake!

This cake is made on the lighter side, which means less frosting than a typical cake, or a typical layer cake anyway.  While I stretched it to cover the sides of a layer cake for purposes of making a last minute baseball cake, I recommend just spreading frosting between the layers and on top of the cake, leaving the sides exposed OR make 1 1/2 times the frosting amount to have enough to fully cover the cake.

And while we are all a little snowed out after this winter, I can tell you one little boy who is elated.  Here is a picture of Adam after the snowstorm we had last week.  He’s loving every minute of it,…which is a different kind of sunshine that is sure to brighten any day.

Lighter Lemon Cake
 
Yields: 12-16 servings
Ingredients
  • Cooking spray
  • 2 cups all-purpose flour
  • 1 teaspoon baking powder
  • ½ teaspoon baking soda
  • pinch salt
  • 1½ cups granulated sugar
  • ½ cup unsalted butter, softened
  • 3 eggs
  • 1 cup buttermilk
  • 2 tablespoons finely granted lemon zest
  • 2 tablespoons fresh lemon juice
  • 1 teaspoon vanilla
  • Icing:
  • 3 cups powdered sugar
  • ¼ cup unsalted butter, melted
  • 1 tablespoon lemon zest
  • ¼/ cup fresh lemon juice, add as needed
Instructions
  1. Preheat oven to 350 degrees. Spray 2 9-inch (or 8-inch) cake pans with cooking spray, line the bottoms with waxed paper and coat the waxed paper with cooking spray. Set aside.
  2. In a medium bowl, whisk together the flour, baking powder, baking soda and salt.
  3. In a large bowl, beat sugar and butter at medium speed with a hand (or stand) mixer until well-blended (about 5 minutes). Add eggs, one at a time, beating well after each addition. Then alternate adding flour mixture and buttermilk, beating on low after each addition until just combined. Last, beat in the lemon zest, juice and vanilla.
  4. Pour equal amounts of batter in prepared pans and sharply tap on counter to remove any bubbles.
  5. Bake for 30 to 35 minutes, or until a toothpick inserted in the center comes out clean. Cool in pans on a wire rack for 10 minutes and then remove from pans to cool completely. Remove waxed paper.
  6. To make icing: In a large bowl, beat powdered sugar, butter, lemon zest and juice until combined and smooth. Frost cake as desired.


Source: Cooking Light, May 2008

Apricot White Chocolate Scones

lighter dried apricot white chocolate chip scones


Happy New Year!  For a special New Year’s Day breakfast, I made these Apriot White Chocolate Scones.  I always forget how quick and easy scones are to make, plus they are much more economical to make at home than to buy them from a local coffee shop.  Tastier too!  The slight tartness of the dried apricots and the sweetness of the white chocolate chips are such a wonderful complement.  I made several changes to the original recipes to lighten it up a bit:  used fat free evaporated milk instead of half and half, used light butter and also replaced some flour with whole wheat pastry flour.  The result was a delicious scone with a nice, moist texture (no dry scones here!).

Apricot White Chocolate Scones
 
Yields: 8 scones
Ingredients
  • 1 cup all-purpose flour
  • ¾ cup whole wheat pastry flour
  • ¼ cup packed brown sugar
  • 2 teaspoons baking powder
  • ⅓ cup cold butter, cut in pieces (I used light butter)
  • ⅓ cup chopped dried apricots
  • ⅓ cup white chocolate baking chips
  • 1 egg
  • ⅓ cup fat free evaporated milk
  • melted white chocolate and additional chopped apricots, for topping (optional)
Instructions
  1. Preheat oven to 400 degrees. Line a cookie sheet with parchment paper and set aside
  2. In a food processor, pulse flours, sugar and baking powder until combined.
  3. Add butter to food processor and pulse until fine crumbs form. Pour mixture into a medium bowl.
  4. Stir apricots and white chocolate chips into flour mixture. Stir in egg and gradually add evaporated milk until dough forms a ball (Note: You may need slightly less than ⅓ cup). Knead dough a few times while in bowl.
  5. Pat or roll dough into 8-inch round on prepared cookie sheet. Cut into 8 wedges (a pizza cutter works well) but DO NOT separate.
  6. Bake for 15 to 20 minutes, or until golden brown and a toothpick inserted in the center comes out clean. Let sit on pan for 5 minutes and then separate wedges (Note: I used a serated knife to ensure clean cuts). Let cool completely.
  7. Optional set: Drizzle melted white chocolate and sprinkle with chopped dried apricots, if desired.


Slightly adapted from Betty Crocker

cream cheese cookies with lemon glaze

Cream Cheese Meltaways

cream cheese meltaways with lemon glaze

Cream Cheese Meltaways with Lemon Glaze are little bite-sized cookies that are a light and delicious addition to any holiday cookie platter.  These cookies were a new addition this year, and they were an instant favorite!  The lemon glaze gives just a hint of lemony sweetness to the cream cheesy butter cookies.  The recipe for glaze makes plenty.  You could probably get by with using half the glaze recipe, or better yet – double the cookie recipe…these will go fast!

Cream Cheese Meltaways
 
Yields: 36 cookies
Ingredients
  • 1¼ cups all-purpose flour
  • ½ cup cornstarch
  • ⅛ teaspoon salt
  • 1 cup powdered sugar
  • ½ cup butter, softened (I used light butter)
  • 2 ounces block-style Neufachtel cream cheese (1/3 less fat/light)
  • 1 teaspoon vanilla
  • Glaze:
  • 1¾ cups powdered sugar
  • ¼ cup fresh lemon juice
  • assorted sprinkles, for decorating (optional)
Instructions
  1. Preheat oven to 375 degrees. Line cookie sheets with parchment paper and set aside.
  2. In a medium bowl, whisk flour, cornstarch and salt until combined.
  3. In a large bowl, add powdered sugar, butter, cream cheese and vanilla and beat at medium speed until light and fluffy.
  4. Add flour mixture to butter mixture, stirring until combined. (Note: dough will be dry and crumbly).
  5. Shape dough into 1-inch balls (be careful not to overwork dough) and place on prepared cookie sheets.
  6. Bake for 8 to 10 minutes, or until bottoms of cookies are lightly browned. Cool 5 minutes of pan and then move to wire rack to cool completely.
  7. GLAZE: In a medium bowl, whisk powdered sugar and lemon juice until smooth. Dip the tops of cooled cookies into glaze and place on wire rack. Decorate with sprinkles, as desired. Let cookies stand until glaze is set.

Source:  Cooking Light

cream cheese meltaways from Alida's Kitchen

Pumpkin Cheesecake Bars

Pumpkin Cheesecake Bars...made on the lighter side!

Pumpkin Cheesecake Bars combine pumpkin and cheesecake into a beautiful layered bar that are as delicious as they are simple to make.  First you make a graham cracker crust.  While that cools completely, you make the cheesecake filling, reserving a portion to add in some pumpkin.  Pour the plain cheesecake layer over the crust.  Dollop the pumpkin layer over the cheesecake layer and try for a swirl effect, if you desire, by running a knife through the batter.  I was liking the simple layered look, so left it as is.  Either way, they taste like a decadent cheesecake with a pumpkin twist.

With the holidays coming up, these Pumpkin Cheesecake Bars are a light alternative to those heavier desserts (or in addition to…I don’t judge!!)  You would never guess it, but they are made on the lighter side, coming in around 115 calories per bar.

If you’re looking for other lighter dessert options, this Crustless Pumpkin Pie is my favorite pie of all time!

Crustless Pumpkin Pie


Pumpkin Cheesecake Bars
 
Yields: 16 bars
Ingredients
  • 1 cup graham cracker crumbs (approx 9 sheets)
  • 2 tablespoons granulated sugar
  • 2 tablespoons light butter, melted (regular butter would work too)
  • Cooking spray
  • 11 ounces light cream cheese (Neufchatel, ⅓ less fat)
  • ⅓ cup light sour cream
  • ⅓ cup granulated sugar
  • 2 teaspoons all-purpose flour
  • 1 teaspoon vanilla extract
  • 1 egg, lightly beaten
  • ½ cup canned pumpkin
  • 1 tablespoon packed brown sugar
  • 1 teaspoon cinnamon
Instructions
  1. Preheat oven to 325 degrees. Spray a 9" square baking pan with cooking spray and set aside.
  2. CRUST: In a small bowl, combine cracker crumbs and sugar; add butter and stir until moistened. Press mixture into prepared baking pan. Bake for 7 to 10 minutes or until set. Move to a wire rack to cool completely.
  3. FILLING: In a large bowl, beat cream cheese, sour cream, sugar, flour and vanilla until smooth. Add egg, and beat on low until just combined.
  4. Pour ¾ cup batter into a small bowl. Add pumpkin, brown sugar and cinnamon, stirring until well blended.
  5. Pour plain batter over cooled crust. Drop dollops of pumpkin batter over the plain batter. Cut through batter with knife to swirl.
  6. Bake at 325 degrees for 20 to 25 minutes or until center is almost set. Cool on wire rack for 1 hour. Cover and refrigerate at least 2 hours to overnight.


Source:  Taste of Home

Be sure to check out all the other bloggers who are participating this week in the 12 Weeks of Christmas Treats blog hop. And if you’re a blogger and want to join in on the fun, check out this post for the form to fill out to start baking along with us.

peanut butter peanut butter chip chocolate chewy cookies

Double Peanut Butter Chocolate Chewies

peanut butter peanut butter chip chocolate chewy cookies
I don’t even know where to begin about these cookies. They have the peanut butter and chocolate combination, which we all know and love. But these Double Peanut Butter Chocolate Chewies are truly not any ordinary chocolate and peanut butter cookie. They are amazingly chewy, without being cakey. They have a delicious balance of peanut butter and chocolate. These cookies are made without any butter and have yogurt and oats to add some wholesome goodness (dare I suggest this makes them fit for breakfast?)

A couple tips:  When flattening the cookies before baking, keep in mind they will spread.  Just flatten them a little bit and you will be fine.  Keep an eye on the bake time, because over baking the cookies will result in a less chewy cookie.  I baked mine for 8 minutes and that was perfect with my oven…but definitely keep an eye on them.

Double Peanut Butter Chocolate Chewies
 
Yields: 36 cookies
Ingredients
  • 1 cup chunky natural peanut butter
  • ¼ cup canola oil
  • ½ cup packed dark brown sugar
  • ½ cup granulated sugar
  • 2 eggs
  • 3 tablespoons nonfat plain Greek yogurt
  • 1 tablespoon vanilla extract
  • ¾ cup all-purpose flour
  • ⅓ cup unsweetened cocoa powder
  • ¼ cup rolled oats (I used quick oats)
  • 1 teaspoon baking soda
  • ½ teaspoon salt
  • ¼ cup semi-sweet chocolate chips
  • ¼ cup peanut butter chips
  • ¼ cup turbinado sugar
Instructions
  1. Preheat oven to 350 degrees. Line cookie sheets with parchment paper and set aside.
  2. In a medium bowl, whisk flour, cocoa, oats, baking soda and salt. Set aside.
  3. In a large bowl, beat peanut butter, oil, brown sugar and granulated sugar on medium speed until blended. Beat in eggs, yogurt and vanilla until combined.
  4. Gradually add flour mixture to the peanut butter mixture, stirring until blended. Stir in chocolate and peanut butter chips.
  5. On prepared cookie sheets, place rounded tablespoonfuls of dough 2 inches apart.
  6. Dip the bottom of a class in water, and then dip the class in turbinado sugar. Using the sugared glass, flatten the dough slightly, leaving a thin layer of sugar on top. Re-wet glass, as needed.
  7. Bake cookies for 8 to 10 minutes (be sure not to over bake!). Cool on baking sheet for 5 minutes before transferring to a wire rack to cool completely.

Barely adapted from Eating Well

healthy lighter chicken parmesan

Light Chicken Parmesan

healthy lighter chicken parmesan

This Light Chicken Parmesan is a delicious and healthy spin on a classic favorite.  There are a few tricks that helped with the lightening up of this dish.  Baking the chicken results in moist meat without having to use any extra fat.  By breading only one side of the chicken, you get the benefit of the delicious breadcrumb/cheese mixture without the excess.  Using part-skim mozzarella cheese helps keep the fat and calories down without sacrificing taste.

healthy lighter chicken parmesan

The sauce can easily be substituted with your favorite marinara (use jarred for a time saver) – simply skip to step 5.  We enjoyed Light Chicken Parmesan with a mixed green side salad for a light, healthy dinner.  Spaghetti tossed a little olive oil, herbs and red pepper flakes would also be a delicious accompaniment to this dish.

Light Chicken Parmesan
 
Yields: 4 servings
Ingredients
  • ½ tablespoon olive oil
  • ½ yellow onion, chopped (about ½ cup)
  • 2 cloves garlic, minced
  • ¼ teaspoon red pepper flakes, adjust to taste
  • ½ teaspoon Italian herb seasoning
  • 14 ounce can crushed tomatoes
  • salt and pepper, to taste
  • 1 tablespoon balsamic vinegar
  • 2 slices whole wheat bread, torn into pieces
  • 1 tablespoon grated Parmesan cheese
  • 1 teaspoon olive oil
  • Coarse salt and ground pepper
  • 2 tablespoons all-purpose flour
  • 1 large egg white
  • 4 boneless, skinless chicken breasts (4 to 6 ounces each)
  • ¾ cup shredded part-skim mozzarella cheese (3 ounces)
Instructions
  1. Make Sauce: Heat oil in medium saucepan over medium. Add onion and cook, stirring frequently, until tender (about 8 minutes). Add garlic, pepper flakes, and Italian herb seasoning. Cook, stirring frequently for 2 minutes.
  2. Add tomatoes and salt and pepper to taste. Cover, increase heat to medium-high and bring to a boil. Uncover and reduce heat to medium low and gently simmer, stirring occasionally, until slightly thickened and flavors combine (about 30 minutes).
  3. Add vinegar and simmer for 5 more minutes. Remove from heat and set aside until slightly cooled.
  4. Using an immersion blender, blender, or food processor, puree sauce until smooth.
  5. Make Chicken: Preheat oven to 425 degrees, with rack in upper third. Line rimmed baking sheet with foil and set aside.
  6. In a food processor, combine bread, Parmesan, oil and a pinch of salt and pepper. Pulse until mixture becomes coarse crumbs; transfer to a shallow bowl.
  7. Place flour in a separate shallow bowl, season with salt and pepper. Place egg white in a third shallow bowl, and beat with fork until frothy.
  8. Dip top side of chicken breast in flour, shaking off excess. Dip same side in egg white, letting excess drip off. Then dip in breadcrumbs, pressing to adhere. Place on prepared baking sheet, breaded side up (Note: you only bread one side). Repeat with remaining chicken.
  9. Bake until breadcrumbs are browned, about 8 to 10 minutes. Remove from oven and sprinkle with mozzarella. Continue baking until chicken is cooked through and cheese is melted and slightly browned, about 2 to 4 minutes.
  10. Serve chicken with a generous amount of sauce.

Light Chicken Parmesan

Source:  Chicken from Everyday Food Light; Sauce adapted slightly from Clean Eating, March, 2012

Herbed Goat Cheese Muffins

Herbed Goat Cheese Muffins are a savory, herb-y muffin stuffed with goat cheese.  The muffins are almost biscuit-like in texture, and the goat cheese center is a delightful contrast with the green onions and herbs.  These are very quick and easy to make and go well with your favorite salad or grilled chicken (or any grillable for that matter!).
Speaking of herbs, do you usually plant an herb garden?  That is my plan for this weekend!  It’s always a tough decision, but I usually plant rosemary, basil, oregano, thyme, and then whatever else looks good.  What’s in your herb garden?

Herbed Goat Cheese Muffins
 
Yields: 12 muffins
Ingredients
  • 1½ cups all-purpose flour
  • 1 tablespoon baking powder
  • 1 teaspoon granulated sugar
  • ¼ teaspoon salt
  • ½ cup (4 ounces) goat cheese, crumbled
  • 1 cup skim milk, divided
  • 2 tablespoons unsalted butter, melted
  • 2 tablespoons canola oil
  • 1 egg
  • ½ cup green onions, chopped
  • ¼ cup fresh chives, chopped
  • ¼ cup fresh parsley, chopped
  • Cooking spray
Instructions
  1. Preheat oven to 400 degrees. Spray 12-cup muffin tin with cooking spray and set aside.
  2. In a large bowl, whisk the flour, baking powder, sugar and salt until combined. Make a well in center of mixture.
  3. Combine goat cheese and 2 tablespoons milk in a small bowl, stirring until blended.
  4. In a medium bowl, whisk together the remaining milk, butter, oil, , egg, green onions, chives and parsley until combined. Add to flour mixture, folding until just moistened.
  5. Spoon half of batter evenly into 12 muffin cups. Top each with goat cheese filling (about 2 teaspoons). Spoon remaining batter over filling.
  6. Bake for 20 minutes or until a toothpick inserted in the center comes out clean. Cool in pans for 5 minutes. Remove from pan and cool in a wire rack.
Source:  Cooking Light way to bake

Root Beer Float Cookies

Sometimes nothing beats a good root beer float. Or at least that’s what I thought until I tried these Root Beer Float Cookies.  While at first I was not quite sure what to expect, that first bite tasted so familiar.  Then it hit me – these cookies taste like a root beer float!

The dough is very simple to make and takes around 10 minutes. To make it easier to work with, I recommend refrigerating the dough for a couple hours (if you can wait overnight, even better).

There are flecks of root beer barrel candies studded throughout each cookie, adding some texture, color and root beer flavor. They are topped with a simple root beer drizzle and additional crushed candies, if desired.  The best part…each cookie comes in around 70 calories!

Root Beer Float Cookies
 
Yields: approximately 4 dozen cookies
Ingredients
  • ½ cup (1 stick) butter, softened
  • 1 cup brown sugar, packed
  • 2 eggs
  • 1 teaspoon vanilla extract
  • ½ cup crushed root beer flavored hard candies (approx 8)
  • 2 cups all-purpose flour
  • 1 teaspoon baking powder
  • ½ teaspoon baking soda
  • ⅛ teaspoon cinnamon
  • ⅛ teaspoon allspice
  • 1 cup powdered sugar
  • 3 to 5 teaspoons root beer (or milk)
  • additional crushed root beer flavored hard candies (optional, for garnish)
Instructions
  1. In a medium bowl, whisk together the flour, baking powder, baking soda, salt cinnamon and allspice.
  2. In a separate large bowl, beat brown sugar and butter on medium speed until light and fluffy. Add eggs and vanilla, beating until combined.
  3. Using a wooden spoon, mix the flour mixture with the butter mixture until just combined. Stir in crushed candies. For best results, refrigerate dough for 1 hour to overnight.
  4. Preheat oven to 350 degrees. Line cookie sheets with parchment paper.
  5. Drop dough by rounded teaspoonfuls about 2 inches apart.
  6. Bake for 8 to 10 minutes, or until edges are slightly golden brown. Cool 5 minutes on cookie sheet and then move cookies to wire rack to cool completely (at least 20 minutes).
  7. Root Beer Glaze: Stir powdered sugar and root beer, adding the root beer by the teaspoonful, until desired consistency is achieved.
  8. Drizzle glaze over cooled cookies and sprinkle with crushed candies, as desired.
Nutrition Information
Calories: 72 Fat: 2g

Adapted from Eat Better America

Lighter Sesame Chicken

This Lighter Sesame Chicken recipe is an easy-to-make, healthier version of a take-out favorite. Lean chicken breast is coated with a light sesame and honey sauce, and served over rice and steamed broccoli. 
 Lighter Sesame Chicken | alidaskitchen.com

This Lighter Sesame Chicken dish has been a staple around our house for years and is truly one of our favorite chicken dishes.  It is easy to make, using ingredients you most likely already have at home.  The recipe also halves easily, making a nice dinner for 2….

Read more