Categories

Cheesy Broccoli Penne Pasta {Alida's Kitchen}

Cheesy Broccoli Penne Pasta


Cheesy  Broccoli Penne Pasta...made on the lighter side!  {Alida's Kitchen}

Cheesy Broccoli Penne Pasta dish is made on the lighter side with a light cheddar and Parmesan sauce and fresh broccoli.  A quick and healthy stove top meal, this is a great weeknight dinner! 

We love cheesy pasta dishes, and generally the more cheese the better, right?   In summer months we tend to gravitate to lighter meals, leaving our beloved cheesy baked pasta dishes by the wayside.  They can be a bit heavy, and while I love baked pasta, I don’t always love to turn on the oven when the temperatures rise.   That’s where this Cheesy Broccoli Penne Pasta dish is perfect.  It has a light cheddar and Parmesan cheese sauce ~ just enough to coat the pasta and broccoli.  And it’s all made on the stove top in under 30 minutes.  You can’t beat that!…

Read more

Lighter Lemon Cake

Right now,  I am listening to the sounds of our snowplow service plowing our driveway. Again.  We got 5 inches of snow yesterday and are projected to get at least another inch today.  It’s mid-late April.  Yikes!  So while I had a different recipe to share with you today, I thought we all could use a little sunshine, well…for a variety of reasons these days. Nothing says sunshine quite like a lemon dessert, and this Lighter Lemon Cake will definitely brighten any day.

Back in February, I shared Adam’s Baseball Birthday cake, and the flavor of that cake was this Lighter Lemon Cake.  Lighter Lemon Cake has become my ‘go-to’ lemon cake.  It has a generous amount of lemon zest and juice, yielding a vibrant lemon flavor, and the buttermilk helps yield a nice, moist crumb.  The lemon zest and juice in the frosting gives an extra lemon boost, which is bright and delicious.  If you like lemon, you’ll love this cake!

This cake is made on the lighter side, which means less frosting than a typical cake, or a typical layer cake anyway.  While I stretched it to cover the sides of a layer cake for purposes of making a last minute baseball cake, I recommend just spreading frosting between the layers and on top of the cake, leaving the sides exposed OR make 1 1/2 times the frosting amount to have enough to fully cover the cake.

And while we are all a little snowed out after this winter, I can tell you one little boy who is elated.  Here is a picture of Adam after the snowstorm we had last week.  He’s loving every minute of it,…which is a different kind of sunshine that is sure to brighten any day.

Lighter Lemon Cake
 
Yields: 12-16 servings
Ingredients
  • Cooking spray
  • 2 cups all-purpose flour
  • 1 teaspoon baking powder
  • ½ teaspoon baking soda
  • pinch salt
  • 1½ cups granulated sugar
  • ½ cup unsalted butter, softened
  • 3 eggs
  • 1 cup buttermilk
  • 2 tablespoons finely granted lemon zest
  • 2 tablespoons fresh lemon juice
  • 1 teaspoon vanilla
  • Icing:
  • 3 cups powdered sugar
  • ¼ cup unsalted butter, melted
  • 1 tablespoon lemon zest
  • ¼/ cup fresh lemon juice, add as needed
Instructions
  1. Preheat oven to 350 degrees. Spray 2 9-inch (or 8-inch) cake pans with cooking spray, line the bottoms with waxed paper and coat the waxed paper with cooking spray. Set aside.
  2. In a medium bowl, whisk together the flour, baking powder, baking soda and salt.
  3. In a large bowl, beat sugar and butter at medium speed with a hand (or stand) mixer until well-blended (about 5 minutes). Add eggs, one at a time, beating well after each addition. Then alternate adding flour mixture and buttermilk, beating on low after each addition until just combined. Last, beat in the lemon zest, juice and vanilla.
  4. Pour equal amounts of batter in prepared pans and sharply tap on counter to remove any bubbles.
  5. Bake for 30 to 35 minutes, or until a toothpick inserted in the center comes out clean. Cool in pans on a wire rack for 10 minutes and then remove from pans to cool completely. Remove waxed paper.
  6. To make icing: In a large bowl, beat powdered sugar, butter, lemon zest and juice until combined and smooth. Frost cake as desired.


Source: Cooking Light, May 2008

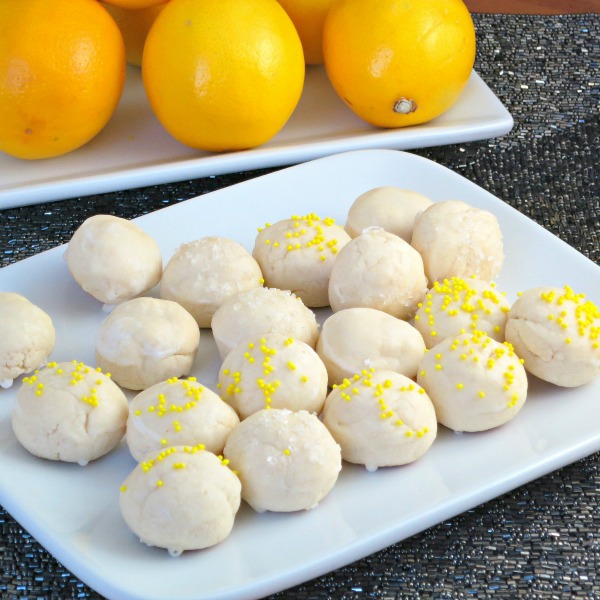
cream cheese cookies with lemon glaze

Cream Cheese Meltaways

cream cheese meltaways with lemon glaze

Cream Cheese Meltaways with Lemon Glaze are little bite-sized cookies that are a light and delicious addition to any holiday cookie platter.  These cookies were a new addition this year, and they were an instant favorite!  The lemon glaze gives just a hint of lemony sweetness to the cream cheesy butter cookies.  The recipe for glaze makes plenty.  You could probably get by with using half the glaze recipe, or better yet – double the cookie recipe…these will go fast!

Cream Cheese Meltaways
 
Yields: 36 cookies
Ingredients
  • 1¼ cups all-purpose flour
  • ½ cup cornstarch
  • ⅛ teaspoon salt
  • 1 cup powdered sugar
  • ½ cup butter, softened (I used light butter)
  • 2 ounces block-style Neufachtel cream cheese (1/3 less fat/light)
  • 1 teaspoon vanilla
  • Glaze:
  • 1¾ cups powdered sugar
  • ¼ cup fresh lemon juice
  • assorted sprinkles, for decorating (optional)
Instructions
  1. Preheat oven to 375 degrees. Line cookie sheets with parchment paper and set aside.
  2. In a medium bowl, whisk flour, cornstarch and salt until combined.
  3. In a large bowl, add powdered sugar, butter, cream cheese and vanilla and beat at medium speed until light and fluffy.
  4. Add flour mixture to butter mixture, stirring until combined. (Note: dough will be dry and crumbly).
  5. Shape dough into 1-inch balls (be careful not to overwork dough) and place on prepared cookie sheets.
  6. Bake for 8 to 10 minutes, or until bottoms of cookies are lightly browned. Cool 5 minutes of pan and then move to wire rack to cool completely.
  7. GLAZE: In a medium bowl, whisk powdered sugar and lemon juice until smooth. Dip the tops of cooled cookies into glaze and place on wire rack. Decorate with sprinkles, as desired. Let cookies stand until glaze is set.

Source:  Cooking Light

cream cheese meltaways from Alida's Kitchen

Cranberry Cornbread

cranberry cornbread
Cranberry Cornbread puts a fun, fall/wintery twist on traditional cornbread.  We have been making chili almost weekly these days, and of course what goes better with chili than cornbread.  I used a cornbread muffin recipe from Cooking Light for the base, making a few adjustments to accommodate the cranberries.  Fresh cranberries add just the right amount of tartness which is balanced nicely with brown sugar.  Buttermilk lends a moist crumb, and the result is a delicious tart-sweet cornbread.  Cranberry Cornbread would make a nice side dish for Thanksgiving, or any holiday, and of course pairs very well with a spicy chili!

Speaking of chili, I am working on a fabulous new chili recipe to share with you soon.  In the meantime, this Three Bean Vegetarian Chili can be made in less than 30 minutes and is our current chili of choice.

Cranberry Cornbread
 
Yields: 16 servings
Ingredients
  • 1¼ cups buttermilk
  • ¼ cup canola oil
  • 1 egg, lightly beaten
  • 1 cup all-purpose flour
  • ¾ cup yellow cornmeal
  • 2 tablespoons brown sugar
  • 2 teaspoons baking powder
  • ¼ teaspoon baking soda
  • ¼ teaspoon salt
  • 1 cup fresh cranberries, halved
  • Cooking spray
  • 1 tablespoon granulated sugar
Instructions
  1. Preheat oven to 400 degrees. Spray 8" square baking pan with cooking spray and set aside.
  2. In a small bowl (or in a liquid measuring cup) combine buttermilk, oil and egg.
  3. In a large bowl, whisk flour, cornmeal, sugar, baking powder, baking soda and salt.
  4. Add milk mixture to flour mixture, folding until just combined. Gently fold in cranberries.
  5. Pour mixture in prepared baking dish. Sprinkle the top with sugar. Bake for 15 to 20 minutes, or until a toothpick inserted in the center comes out clean. Cool on wire rack.

Adapted from Cooking Light, September, 2012

cranberry cornbread

healthy buttermilk chocolate banana swirl bread

Marbled Chocolate Banana Bread

healthy buttermilk chocolate banana swirl bread

Marbled Chocolate Banana Bread is a moist banana bread with a chocolate swirl.  The addition of chocolate to the classic comfort food of banana bread is not only delicious but it’s pretty too!

Truth be told, the first time I made this bread, the result was less than stellar. The bread was pretty, and it tasted okay, but texture was off. It was dense and chewy, not quite the light and fluffy texture I look for in a banana bread. And actually come to think of it, even though it tasted good, it didn’t taste like banana bread.   Clearly, this recipe was in desperate need of a do-over!

healthy buttermilk chocolate banana swirl bread

Thankfully Frigidaire is encouraging folks to share do-over moments, which gave me the extra push I needed to try again.   I never like wasting ingredients on an unsuccessful recipe, but I loved the concept of the chocolate swirl in banana bread.  So I took the original recipe and gave it a makeover.

I made several tweaks, such as using buttermilk instead of yogurt, oil instead of butter and eggs instead of egg substitute. I also added some vanilla and a few extra chocolate chips on top. Then…I crossed my fingers!

healthy buttermilk chocolate banana swirl bread

A little over an hour later, the results of this do-over were in.  The bread rose nicely, had the perfect banana bread texture, and the chocolate swirl was harmonious with the banana bread.  This is exactly what Marbled Chocolate Banana Bread should be like!  I look forward to making this recipe again and again, and I thank Frigidaire for this do-over opportunity!

Marbled Chocolate Banana Bread
 
Yields: 1 loaf (16 servings)
Ingredients
  • 2 cups all-purpose flour
  • ¾ teaspoon baking soda
  • ½ teaspoon salt
  • 1 cup granulated sugar
  • ¼ cup vegetable oil
  • 1½ cups mashed ripe banana (about 3 bananas)
  • 2 eggs
  • ⅓ cup low fat buttermilk
  • 1 teaspoon vanilla extract
  • ½ cup semisweet chocolate chips
  • Cooking spray
  • Additional mini chocolate chips, for topping (optional)
Instructions
  1. Preheat oven to 350 degrees. Spray 8½ x 4¼ inch loaf pan with cooking spray and set aside.
  2. In a medium bowl, whisk flour, baking soda and salt.
  3. In a large bowl, beat sugar and oil on medium until blended (about 1 minute). Add banana, egg, buttermilk and vanilla, and beat until blended.
  4. Fold the flour mixture into the banana mixture, gently stirring batter until just moist.
  5. Place chocolate chips in a medium microwave-safe bowl and microwave for 1 minute (on high) or until almost melted. Microwave for an additional 30 seconds, if needed. Stir until smooth and let cool slightly.
  6. Add 1 cup batter to the chocolate, stirring until well combined.
  7. Spoon batter into prepared loaf pan, alternating between plain batter and chocolate batter. Swirl batters together using a knife. Sprinkle top with additional chocolate chips, if desired.
  8. Bake for 1 hour and 10 to 15 minutes, or until a toothpick inserted in the center comes out clean. Cool 10 minutes in pan on a wire rack and the remove from pan to wire rack to cool completely.


Adapted from Cooking Light

Disclaimer: This post was sponsored by Frigidaire. When you share your own do-over moment at Facebook.com/Frigidaire, Frigidaire will donate $1 to Save the Children’s U.S. programs. Plus, Frigidaire will help cover the costs for one lucky visitor to win the ultimate do-over.

Herbed Goat Cheese Muffins

Herbed Goat Cheese Muffins are a savory, herb-y muffin stuffed with goat cheese.  The muffins are almost biscuit-like in texture, and the goat cheese center is a delightful contrast with the green onions and herbs.  These are very quick and easy to make and go well with your favorite salad or grilled chicken (or any grillable for that matter!).
Speaking of herbs, do you usually plant an herb garden?  That is my plan for this weekend!  It’s always a tough decision, but I usually plant rosemary, basil, oregano, thyme, and then whatever else looks good.  What’s in your herb garden?

Herbed Goat Cheese Muffins
 
Yields: 12 muffins
Ingredients
  • 1½ cups all-purpose flour
  • 1 tablespoon baking powder
  • 1 teaspoon granulated sugar
  • ¼ teaspoon salt
  • ½ cup (4 ounces) goat cheese, crumbled
  • 1 cup skim milk, divided
  • 2 tablespoons unsalted butter, melted
  • 2 tablespoons canola oil
  • 1 egg
  • ½ cup green onions, chopped
  • ¼ cup fresh chives, chopped
  • ¼ cup fresh parsley, chopped
  • Cooking spray
Instructions
  1. Preheat oven to 400 degrees. Spray 12-cup muffin tin with cooking spray and set aside.
  2. In a large bowl, whisk the flour, baking powder, sugar and salt until combined. Make a well in center of mixture.
  3. Combine goat cheese and 2 tablespoons milk in a small bowl, stirring until blended.
  4. In a medium bowl, whisk together the remaining milk, butter, oil, , egg, green onions, chives and parsley until combined. Add to flour mixture, folding until just moistened.
  5. Spoon half of batter evenly into 12 muffin cups. Top each with goat cheese filling (about 2 teaspoons). Spoon remaining batter over filling.
  6. Bake for 20 minutes or until a toothpick inserted in the center comes out clean. Cool in pans for 5 minutes. Remove from pan and cool in a wire rack.
Source:  Cooking Light way to bake

Smoked Gouda Baked Pasta with Broccoli

smoked gouda macaroni and cheese with broccoli

I recently made an old favorite frittata recipe using smoked Gouda cheese.  The good thing about smoked Gouda is that it is so flavorful, a little goes a long way.  That also means that whenever I purchase a block for a specific recipe, there is usually some leftover.  Not a bad problem to have, that’s for sure.  This time I decided to put it to use with a fun twist on a classic ~ Smoked Gouda Baked Pasta with Broccoli.  Who doesn’t love fancy, new versions of macaroni and cheese!

The first time I made macaroni and cheese with smoked Gouda, it was really tasty, but there was something missing.  The smoked Gouda wasn’t as pronunced as I had hoped.  So after experimenting with some seasoning, I found a little paprika was the key.  It really brought out the smoked Gouda flavor.  The broccoli was also a nice addition to this dish, giving a nutrition boost while adding some texture and color.  One can never have too many mac ‘n cheese recipes, and this version is definitely a keeper!

Smoked Gouda Baked Pasta with Broccoli
 
Yields: 4 servings
Ingredients
  • 8 ounces short pasta (such as elbows, penne, rotini)
  • ½ cup bread crumbs
  • 1 teaspoon olive oil
  • 1 cup yellow onion, chopped
  • 2-3 garlic cloves, minced
  • 2 tablespoons all-purpose flour
  • 2 cups skim milk
  • ½ teaspoon paprika
  • ½ teaspoon ground dry mustard
  • ½ teaspoon salt
  • ¼ teaspoon black pepper
  • ½ cup (2 ounces) smoked Gouda cheese, shredded
  • ⅓ cup (about 1½ ounces) grated fresh Parmesan cheese
  • 12 ounces frozen broccoli florets, thawed and lightly chopped
  • Cooking spray
Instructions
  1. Preheat oven to 350 degrees.
  2. Cook pasta according to package instructions. Set aside.
  3. In a large saucepan, heat oil over medium heat. Add onion and cook until softened (about 5 to 7 minutes). Add garlic and saute for 1 minute. Add flour and cook, stirring constantly, until lightly toasted (about 1 minute).
  4. Gradually add milk, paprika, mustard, salt and pepper, whisking constantly. Bring to a boil, and then cook until thickened (about 2 to 3 minutes).
  5. Add cheeses to milk mixture, stirring until melted and then remove from heat.
  6. Add broccoli and cooked pasta to the cheese sauce, stirring until well-blended.
  7. Pour into a 2-quart baking dish coated with cooking spray. Sprinkle with breadcrumbs.
  8. Bake uncovered for 15 minutes, or until bubbly.

Adapted from Cooking Light

Pulled Chicken Sandwiches

healthy lighter pulled chicken sandwiches

Our weather has been all over the place lately. We had a stretch of 80-degree days in March, yet just awe got some snow. It’s all a bit confusing, but we know summer is near.  This has me thinking about summertime eats, which led me to these Pulled Chicken Sandwiches.  These healthy sandwiches taste like a summer barbeque, but can easily be enjoyed all year long.

Inspired from my Chicken Tostada Salad, I decided to poach the chicken breasts and then used 2 forks to shred the chicken. Actually, Mike shredded the chicken while I wiped out the pan and heated up the sauce. At that point, it’s just a matter of minutes until dinner is served.  The original recipe calls for shredded rotisserie chicken, which would be a great time saver (just skip to step 3).  Either way, these Pulled Chicken Sandwiches can be made in less than 30 minutes, making them a great weeknight dinner, or any time!

lighter healthy pulled chicken sandwiches

Pulled Chicken Sandwiches
 
Yields: 4 servings
Ingredients
  • 1 pound chicken breast, boneless, skinless
  • Salt
  • 1 cup ketchup
  • 2 tablespoons dijon mustard
  • 2 tablespoons cider vinegar
  • 1 tablespoon brown sugar
  • 2 teaspoons Sriracha sauce (or regular hot sauce), adjust to taste
  • 2 teaspoons chili powder
  • 1 teaspoon garlic powder
  • 1 teaspoon onion powder
  • 1 teaspoon paprika
  • 1 teaspoon ground cumin
  • 4 whole wheat buns, toasted
  • 1 cup broccoli slaw (optional, for topping)
Instructions
  1. Put chicken in a large sauce pan and then add enough water to cover the chicken. Add a couple pinches of salt. Bring liquid to a boil and then reduce to a simmer for about 5 minutes. Then cover, remove from heat and let sit for 12 to 15 minutes, or until chicken is thoroughly cooked.
  2. Put cooked chicken in a separate bowl and, using 2 forks, shred chicken. Wipe out sauce pan to use for sauce.
  3. In sauce pan, whisk the ketchup, mustard, vinegar, sugar, hot sauce, chili powder, garlic powder, onion powder, paprika and cumin until combined. Put over medium heat to bring the sauce to a simmer until slightly thickened (about 3 minutes).
  4. Add chicken to the sauce, tossing to coat and to warm up the chicken (about 1 to 2 minutes).
  5. Divide chicken evenly among buns and top with slaw, as desired. Serve immediately.
Notes
For a lighter alternative, use a low-carb tortilla instead of a bun and call it a taco!

Nutrition Info per serving of chicken/sauce
Calories: 200
Fat: 1.2g
Carbs:  21g
Fiber: 0g
Protein:  26.2g

Amounts for your bun or tortilla will be in addition to the above.  The whole wheat bun I used was 160 calories, which was average-sized.

Adapted from Cooking Light

healthy cheesy potato soup with broccoli

Lighter Cheesy Potato Soup with Broccoli

healthy cheesy potato soup with broccoli
So I just logged in to do a final proofread of this Cheesy Potato Soup recipe, and my post was gone.  Blank.  Nothing.  It was my best post ever.  It was witty and insightful, delivered a life-changing message – all.  gone.  Seriously folks…my mommy brain cannot recreate the greatness of that post, so I will simply cut to the chase and get to the real reason why you’re here…the soup!
Lighter Cheesy Potato Soup is one of the tastiest soups I’ve ever had and is also very easy to make. Win-win if you ask me!   I decided to add some broccoli for color and to bump up the nutrition level.  I also added more cheese than called for in the original recipe.  For the love of cheese, it’s a ‘cheesy’ soup!  We’re using reduced-fat cheese here, so this only adds 45 calories per serving.  It is worth every bit, trust me.
The result is a light and healthy soup, filled with perfectly tender potatoes, vitamin-packed broccoli and calcium-rich cheese.  Mike noted the consistency was just perfect for a cheese soup – not heavy, drips off the spoon nicely.  I’d say this is a keeper for sure!

healthy cheesy potato soup with broccoli
Lighter Cheesy Potato Soup with Broccoli
 
Yields: 4 servings
Ingredients
  • 1 tablespoon butter
  • 1 yellow onion, chopped
  • 2½ tablespoons all-purpose flour
  • 3 cups chopped red potato (about 1 pound)
  • 3-4 cups broccoli florets (about 1 stalk)
  • 1¼ cups skim milk (or 1%)
  • ¾ cup vegetable broth (or chicken broth)
  • ½ cup water
  • 1 cup (4 ounces) reduced fat (2%) sharp cheddar cheese, shredded
  • ¼ teaspoon cayenne
  • 2 tablespoons chopped green onions (optional)
Instructions
  1. In a medium sauce pan, melt butter over medium-high heat. Add onion and saute 5 minutes or until onion is tender. Sprinkle with flour; cook 1 minute, stirring onion mixture constantly.
  2. Add potato, broccoli, milk, broth and water to pan; bring to boil. Cover, reduce heat and simmer 10 minutes.
  3. Add cheese, cayenne pepper, cook 2 minutes or until cheese melts, stirring frequently. Remove from heat immediately once cheese has melted. Top each serving with chopped green onions, if desired.
Adapted from Cooking Light, Jan/Feb, 2012

Lemon Ricotta Muffins

Bring on citrus season!  When life gives me a bowl of lemons, you better believe I’m going to make some muffins!  And perhaps some lemonade to wash them down, but that’s another post all together.  For now it’s all about muffins, as these Lemon Ricotta Muffins definitely deserve the spotlight.  They are bright, perfectly sweet and bonus – they’re low in fat, though you would never know it.  The ricotta cheese gives the muffins a moist, soft texture, and the flavor goes perfectly with the lemon.  The taste is reminiscent of delicious lemon ricotta pancakes, only a bit more portable.

With the wonderful citrus bounty upon us, over the next few weeks I will be sharing several recipes using citrus fruits.  In the meantime, grab those lemons and give these muffins a try!

Lemon Ricotta Muffins
 
Yields: 12 muffins
Ingredients
  • 1 cup all-purpose flour
  • ¾ cup whole wheat pastry flour
  • ¾ cup granulated sugar
  • 2½ teaspoons baking powder
  • ¼ teaspoons salt (optional)
  • ¾ cup low fat ricotta cheese
  • ½ cup water
  • ¼ cup canola oil
  • 2 tablespoons fresh lemon juice
  • 1 tablespoon fresh lemon zest
  • 1 egg, lightly beaten
  • 1 teaspoon vanilla extract
  • 2 tablespoons turbinado sugar
Instructions
  1. Preheat oven to 375 degrees. Prepare 12 muffin cups with paper liners or cooking spray. Set aside.
  2. In a large bowl, mix the flour, sugar, baking powder and salt. Make a well in the center.
  3. In a medium bowl, whisk the ricotta, water, oil, lemon juice, lemon zest, egg, and vanilla until blended.
  4. Fold the ricotta mixture into the flour mixture until just blended.
  5. Divide batter evenly among muffin cups. Sprinkle turbinado sugar over the tops of the muffins.
  6. Bake for 16 minutes, or until a toothpick inserted in the center comes out clean. Let muffins sit in pan for 5 minutes and then remove to wire rack to cool completely.

Adapted from Cooking Light