Categories

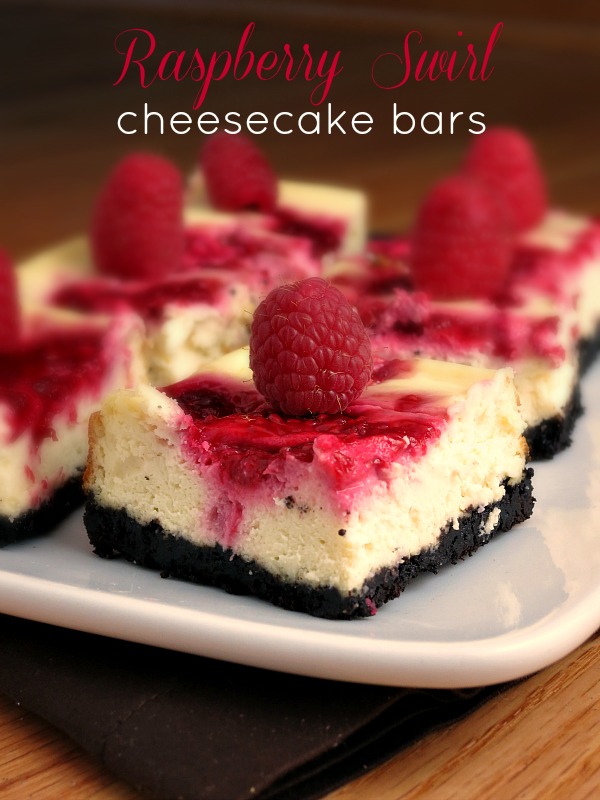
Raspberry Swirl Cheesecake Bars | alidaskitchen.com

Raspberry Swirl Cheesecake Bars #SundaySupper

Raspberry Swirl Cheesecake Bars | alidaskitchen.com

Raspberry Swirl Cheesecake Bars are a decadent dessert made on the lighter side that is simple to make.  If you’re intimidated by making a full cheesecake, or just looking for a quick and easy recipe for a cheesecake fix, then these bars are you for you!  In 30 minutes you make the crust, the cheesecake filling, and even a fresh raspberry sauce….

Read more

Over 30 Perfect Party Dips and Desserts | alidaskitchen.com

30+ Perfect Party Dips and Desserts #HolidayHelper

NRFA Disclosure

Over 30 recipes for Perfect Party Dips and Desserts made using cream cheese, yogurt or sour cream that are easy to make and great for a crowd.  For all of these recipes and more, be sure to visit my Perfect Party Dips and Dessert board on Pinterest!

Over 30 Perfect Party Dips and Desserts | alidaskitchen.com

Lately I have been receiving many requests for party menu ideas, as people begin planning their Holiday festivities.  I thought it would be fun to share some recipes from my favorite bloggers.  I gathered the most amazing appetizer and dessert recipes ~ think savory dips and spreads, as well as dessert dips and simple cheesecakes.   They are all easy to make, many require no cooking or baking, which is all very welcome when it comes to planning a party!

Read more

Tortellini Primavera - a quick and healthy pasta dish made on the lighter side!

Tortellini Primavera #WeekdaySupper


IMG_4779-PMc

Tortellini Primavera is a creamy, cheesy pasta dish made with with lots of vegetables.  It is quick, easy and healthy ~ perfect for a weeknight!

Like most people, we are always looking for quick and easy recipes for weeknight dinners.  While frozen pizza or takeout seem like a quick fix for those busy nights, we always prefer something healthier, tastier, and homemade.  But like I said, it has to be easy, right?  This Tortellini Primavera is all that, plus it’s super tasty!  With all the vegetables, the cheese, the creaminess, the cheese-filled tortellini, and being easy to make, you really can’t go wrong.  …

Read more

Cheesy Broccoli Penne Pasta {Alida's Kitchen}

Cheesy Broccoli Penne Pasta


Cheesy  Broccoli Penne Pasta...made on the lighter side!  {Alida's Kitchen}

Cheesy Broccoli Penne Pasta dish is made on the lighter side with a light cheddar and Parmesan sauce and fresh broccoli.  A quick and healthy stove top meal, this is a great weeknight dinner! 

We love cheesy pasta dishes, and generally the more cheese the better, right?   In summer months we tend to gravitate to lighter meals, leaving our beloved cheesy baked pasta dishes by the wayside.  They can be a bit heavy, and while I love baked pasta, I don’t always love to turn on the oven when the temperatures rise.   That’s where this Cheesy Broccoli Penne Pasta dish is perfect.  It has a light cheddar and Parmesan cheese sauce ~ just enough to coat the pasta and broccoli.  And it’s all made on the stove top in under 30 minutes.  You can’t beat that!…

Read more

Chewy M&M Sugar Cookies | alidaskitchen.com

Chewy M&M Sugar Cookies

 Chewy M&M Sugar Cookies add M&M chocolate candies to the best chewy sugar cookie recipe, resulting in one of my favorite cookies of all time. These are also fun for holidays!
Chewy M&M Sugar Cookies | alidaskitchen.com

When I first saw a recipe for Chewy M&M Sugar Cookies, and realized it used the same base recipe as my Chewy Sugar Cookies I knew they were going to be good.  Since those cookies are one of my favorites of all time, I figured M&Ms could only make them better, right?  Right!  The sugar cookie base is deliciously chewy and the cream cheese adds a little tang. Chocolate bursts of M&Ms are studded throughout. Chewy sugar cookies made with M&Ms. Genius idea.

I love how cute these look and that they can be made festive for any occasion.  Truth be told, I have been trying to make these cookies for months. I have M&Ms for every holiday stocked in my treat drawer that were intended to be used for Chewy M&M Sugar Cookies.  While I used Easter “Bunny Mix” M&Ms, these are made in honor of Spring (since there won’t be any left for Easter…Oops!).

Chewy M&M Sugar Cookies | alidaskitchen.com

Chewy M&M Sugar Cookies
 
Yields: 24 cookies
Ingredients
  • 2¼ cups all-purpose flour
  • 1 teaspoon baking powder
  • ½ teaspoon baking soda
  • ½ teaspoon salt
  • 1½ cups sugar, plus ⅓ cup for rolling
  • 2 ounces cream cheese, cut into 12 pieces (I used ⅓ less fat cream cheese)
  • 6 tablespoons unsalted butter, melted and hot
  • ⅓ cup canola oil
  • 1 large egg
  • 1 tablespoon milk (I used skim)
  • 2 teaspoons vanilla extract
  • 1⅓ cup M&M chocolate candies
Instructions
  1. Preheat oven to 350 degrees. Line 2 large baking sheets with parchment paper. Place ⅓ cup sugar in a shallow bowl and set aside (this will be used for rolling).
  2. In a medium bowl, whick the flour, baking powder, baking soda and salt. Set aside.
  3. In a large bowl, add 1½ cups sugar and cream cheese. Pour butter over sugar and cream cheese and whisk to combine (some small lumps may remain). Whisk in oil until incorporated. Add egg, milk and vanilla; continue to whisk until smooth.
  4. Add flour mixture and mix with rubber spatula. Add 1 cup of M&Ms and continue mixing until dough forms.
  5. Divide dough into 24 equal pieces. Using hands, roll dough into balls. Roll balls in reserved sugar to coat and place on prepared baking sheets, 12 balls per sheet. Using bottom of drinking glass, flatten balls until 2 inches in diameter. Using remaining M&Ms, gently press 2-3 candies onto tops of cookies.
  6. Bake 1 tray at a time until edges are set and beginning to brown, about 9 to 12 minutes. Let cookies cool on sheets for 5 minutes. Transfer cookies to wire rack and let cool completely before serving.

Source:  as seen on Carrie’s Sweet Life, originally fromTracey’s Culinary Adventures

Chewy M&M Sugar Cookies | alidaskitchen.com

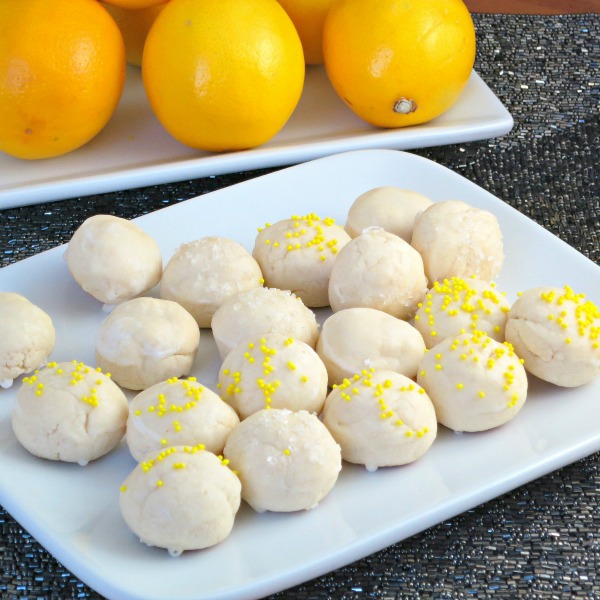
cream cheese cookies with lemon glaze

Cream Cheese Meltaways

cream cheese meltaways with lemon glaze

Cream Cheese Meltaways with Lemon Glaze are little bite-sized cookies that are a light and delicious addition to any holiday cookie platter.  These cookies were a new addition this year, and they were an instant favorite!  The lemon glaze gives just a hint of lemony sweetness to the cream cheesy butter cookies.  The recipe for glaze makes plenty.  You could probably get by with using half the glaze recipe, or better yet – double the cookie recipe…these will go fast!

Cream Cheese Meltaways
 
Yields: 36 cookies
Ingredients
  • 1¼ cups all-purpose flour
  • ½ cup cornstarch
  • ⅛ teaspoon salt
  • 1 cup powdered sugar
  • ½ cup butter, softened (I used light butter)
  • 2 ounces block-style Neufachtel cream cheese (1/3 less fat/light)
  • 1 teaspoon vanilla
  • Glaze:
  • 1¾ cups powdered sugar
  • ¼ cup fresh lemon juice
  • assorted sprinkles, for decorating (optional)
Instructions
  1. Preheat oven to 375 degrees. Line cookie sheets with parchment paper and set aside.
  2. In a medium bowl, whisk flour, cornstarch and salt until combined.
  3. In a large bowl, add powdered sugar, butter, cream cheese and vanilla and beat at medium speed until light and fluffy.
  4. Add flour mixture to butter mixture, stirring until combined. (Note: dough will be dry and crumbly).
  5. Shape dough into 1-inch balls (be careful not to overwork dough) and place on prepared cookie sheets.
  6. Bake for 8 to 10 minutes, or until bottoms of cookies are lightly browned. Cool 5 minutes of pan and then move to wire rack to cool completely.
  7. GLAZE: In a medium bowl, whisk powdered sugar and lemon juice until smooth. Dip the tops of cooled cookies into glaze and place on wire rack. Decorate with sprinkles, as desired. Let cookies stand until glaze is set.

Source:  Cooking Light

cream cheese meltaways from Alida's Kitchen

pumpkin cream cheese filled cupcakes

Pumpkin Surprise Cupcakes

pumpkin cream cheese filled cupcakes

So I couldn’t help myself…I had to share one last pumpkin recipe with you.  It’s a good one.  Pumpkin Surprise Cupcakes are a moist, delicious pumpkin cake with a cream cheese surprise in the middle.  A little sprinkling of powdered sugar on top is all these cupcakes need before presenting, which makes them ideal for travel or eating at a gathering since they won’t get all messy.  While these cupcakes can hold their own without any frosting, they would also be really good with a little Cinnamon Cream Cheese Frosting if you want to get fancy.  Pumpkin Surprise Cupcakes are an easy, portable and fun little pumpkin alternative to tomorrow’s traditional pie.


By the way, can you believe we’re already in Week #9 of the 12 Weeks of Christmas Treats!  Due to the Thanksgiving holiday this Thursday, many of us are posting starting today through the rest of the week, so be sure to check out all of the yummy treats by clicking on the thumbnails at the bottom of this post.

Have a Happy Thanksgiving!!

Pumpkin Surprise Cupcakes
 
Yields: 24 cupcakes
Ingredients
  • 2 cups all-purpose flour
  • 2 teaspoons baking powder
  • 2 teaspoons cinnamon
  • 1 teaspoon baking soda
  • pinch of salt
  • 1 can (15 ounces) pure pumpkin
  • 2 cups granulated sugar
  • 1 cup canola oil
  • 4 eggs
  • 1 teaspoon vanilla
  • 8 ounces light cream cheese, softened
  • ⅓ cup granulated sugar
  • 1 egg
  • Powdered sugar, for topping (optional)
Instructions
  1. Preheat oven to 350 degrees. Line 2 12-cup muffin tins with paper liners and set aside.
  2. In a small bowl, whisk together the flour, baking powder, cinnamon, baking soda and salt. Set aside.
  3. In a large bowl, beat pumpkin, sugar, oil, eggs and vanilla until combined. Add flour mixture to pumpkin mixture, gently folding until well-blended.
  4. FILLING: In a separate small bowl, beat cream cheese and sugar until smooth. Add egg and beat on low until just combined.
  5. Fill muffin cups approximately one-third full. Distribute evenly among cupcakes, dropping a generous tablespoonful in the enter of each cupcake. Cover with remaining batter.
  6. Bake for 20 to 25 minutes, or until a toothpick inserted in the pumpkin cake portion comes out clean. Cool for 10 minutes before moving to a wire rack to cool completely. Dust with powdered sugar just before serving (or frost as desired).

Source: Taste of Home


Be sure to check out all the other bloggers who are participating this week in the 12 Weeks of Christmas Treats blog hop. And if you’re a blogger and want to join in on the fun, check out this post for the form to fill out to start baking along with us.

Pumpkin Cheesecake Bars

Pumpkin Cheesecake Bars...made on the lighter side!

Pumpkin Cheesecake Bars combine pumpkin and cheesecake into a beautiful layered bar that are as delicious as they are simple to make.  First you make a graham cracker crust.  While that cools completely, you make the cheesecake filling, reserving a portion to add in some pumpkin.  Pour the plain cheesecake layer over the crust.  Dollop the pumpkin layer over the cheesecake layer and try for a swirl effect, if you desire, by running a knife through the batter.  I was liking the simple layered look, so left it as is.  Either way, they taste like a decadent cheesecake with a pumpkin twist.

With the holidays coming up, these Pumpkin Cheesecake Bars are a light alternative to those heavier desserts (or in addition to…I don’t judge!!)  You would never guess it, but they are made on the lighter side, coming in around 115 calories per bar.

If you’re looking for other lighter dessert options, this Crustless Pumpkin Pie is my favorite pie of all time!

Crustless Pumpkin Pie


Pumpkin Cheesecake Bars
 
Yields: 16 bars
Ingredients
  • 1 cup graham cracker crumbs (approx 9 sheets)
  • 2 tablespoons granulated sugar
  • 2 tablespoons light butter, melted (regular butter would work too)
  • Cooking spray
  • 11 ounces light cream cheese (Neufchatel, ⅓ less fat)
  • ⅓ cup light sour cream
  • ⅓ cup granulated sugar
  • 2 teaspoons all-purpose flour
  • 1 teaspoon vanilla extract
  • 1 egg, lightly beaten
  • ½ cup canned pumpkin
  • 1 tablespoon packed brown sugar
  • 1 teaspoon cinnamon
Instructions
  1. Preheat oven to 325 degrees. Spray a 9" square baking pan with cooking spray and set aside.
  2. CRUST: In a small bowl, combine cracker crumbs and sugar; add butter and stir until moistened. Press mixture into prepared baking pan. Bake for 7 to 10 minutes or until set. Move to a wire rack to cool completely.
  3. FILLING: In a large bowl, beat cream cheese, sour cream, sugar, flour and vanilla until smooth. Add egg, and beat on low until just combined.
  4. Pour ¾ cup batter into a small bowl. Add pumpkin, brown sugar and cinnamon, stirring until well blended.
  5. Pour plain batter over cooled crust. Drop dollops of pumpkin batter over the plain batter. Cut through batter with knife to swirl.
  6. Bake at 325 degrees for 20 to 25 minutes or until center is almost set. Cool on wire rack for 1 hour. Cover and refrigerate at least 2 hours to overnight.


Source:  Taste of Home

Be sure to check out all the other bloggers who are participating this week in the 12 Weeks of Christmas Treats blog hop. And if you’re a blogger and want to join in on the fun, check out this post for the form to fill out to start baking along with us.

Easy Chocolate Sandwich Cookies

cake mix homemade oreo cookies with cream cheese filling

Easy Chocolate Sandwich Cookies are a simplified version of a chewy homemade Oreo cookie.  The chocolate cookies are soft, yet sturdy and the filling is a sweetened cream cheese frosting.  The dough literally took me 5 minutes minutes to whip together.  I feared the dough would be gooey and messy to work with, but it was quite firm and rolled into balls by hand without a huge sticky mess.

These cookies are fun any holiday or celebration because you can color the filling to suit any occasion or simply roll the sides in sprinkles for a cute, colorful decoration.  The recipe yields a generous amount of cookies, which is perfect if you’re looking to share.  It also halves easily, which is what I did…(I still shared though) 🙂

I am sharing these delicious yet super easy cookies as part of Week 4 of the 12 Weeks of Christmas Treats, hosted by Meal Planning Magic.  While this recipe makes plenty and these cookies are perfect for any holiday cookie platter, I made them pink in honor of Breast Cancer Awareness Week hosted by Erin of Dinners, Dishes and DessertsTo conclude Breast Cancer Awareness Week, tomorrow Erin is hosting a giveaway, so be sure to visit Dinners, Dishes and Desserts on Friday for a chance to win!

Be sure to check out the thumbnails at the bottom of this post and visit the other bloggers who are posting amazing recipes today in support of Breast Cancer Awareness, and also for the 12 Weeks of Christmas Treats!

Easy Chocolate Sandwich Cookies
 
Yields: approximately 4 dozen sandwich cookies
Ingredients
  • 2 packages devil's food cake mix
  • 4 eggs, lightly beaten
  • ⅔ cup vegetable oil
  • 1 package (8 ounces) cream cheese, softened - (I used Neufachtel / ⅓ less fat)
  • 3 to 4 cups powdered sugar
  • 1 teaspoon vanilla extract
  • food coloring or sprinkles for decorating, if desired
Instructions
  1. Preheat oven to 350 degrees. Line cookie sheets with parchment paper and set aside.
  2. In a large mixing bowl, beat cake mixes, eggs and oil until combined (Note: I used a hand mixer; batter will be very stiff).
  3. Roll dough into 1-inch balls and place on prepared baking sheet. Using the side of a silicone spatula, press to flatten the balls slightly.
  4. Bake for 8 to 10 minutes. Remove to a wire rack to cool completely before filling. (Note: I baked the cookies the night before and did the filling the next day).
  5. For the filling: In a medium mixing bowl, beat cream cheese, powdered sugar and vanilla extract until smooth. Add food coloring, if desired.
  6. Spread filling on bottom of half of the cookies. Top with remaining cookies. Finish decorating, as desired.

Source:  Taste of Home: Best Loved Cookies and Bars

Be sure to check out the bloggers who are supporting Breast Cancer Awareness Week for some delicious pink and/or healthy recipes! 

Be sure to check out all the other bloggers who are participating this week in the 12 Weeks of Christmas Treats blog hop. And if you’re a blogger and want to join in on the fun, check out this post for the form to fill out to start baking along with us

chocolate cream cheese chocolate chips cupcakes

Black Bottom Cupcakes

chocolate cream cheese chocolate chips cupcakes healthy easy

Black Bottom Cupcakes are one of my favorite desserts to make (and eat!).  They are chocolate cake and chocolate chip cheesecake at its finest, and they are so quick and easy to make.  The chocolate cake is a nice and light basic chocolate cake, which pairs nicely with the rich chocolate chip cheesecake filling.  The cheesecake filling takes the place of buttery frosting, which makes these cupcakes a lighter option.  They’re also less messy, making these one of my go-tos when I’m in charge of bringing a dessert.  Everybody always loves them.  Black Bottom Cupcakes are made with simple ingredients that can be kept on hand at all times, making them perfect for parties, travel, potlucks, or simply when the craving strikes.

chocolate cream cheese chocolate chips cupcakes healthy easy


Black Bottom Cupcakes
 
Yields: 18-24 cupcakes
Ingredients
FILLING:
  • 8-ounce block Neufachtel cream cheese (1/3 less fat), room temperature
  • 1 egg
  • ⅓ cup granulated sugar
  • 1 teaspoon vanilla extract
  • 1 cup semi-sweet chocolate chips (I used miniature chips)
CAKE:
  • 1½ cups all-purpose flour
  • 1 cup brown sugar, packed
  • ¼ cup unsweetened cocoa powder
  • 1 teaspoon baking powder
  • ½ teaspoon salt (optional)
  • 1 cup water
  • ⅓ cup canola oil
  • 1 tablespoon cider vinegar
  • 1 teaspoon vanilla extract
Instructions
  1. Preheat oven to 350 degrees. Line muffin tin cups with paper liners or spray with cooking spray. Set aside.
  2. First make the filling: In a small bowl, beat cream cheese, egg, sugar and egg until combined and fluffy. Stir in chocolate chips and set aside.
  3. Then make then cake: In a large bowl, whisk together flour, sugar, cocoa, baking powder and salt (if using). Make a well in the center.
  4. In a small bowl, stir water, oil, vinegar and vanilla until combined. (Note: I just mix everything in my liquid measuring cup...one less dish to wash).
  5. Add liquid mixture to dry ingredients, pouring into the well. Fold gently until well blended.
  6. Divide cake batter evenly among prepared muffin cups. Then divide the filling evenly over cake batter by spooning a dollop of the cream cheese filling over the cake batter.
  7. Bake for 20 to 25 minutes, or until cake is set. Let cool in pan for 5 minutes and then transfer to a wire rack to cool completely.


Adapted from allrecipes.com