Categories

Oreo Cookies and Cream Muffins

oreo cookies and cream muffins

Oreo Cookies and Cream Muffins are a tasty vanilla muffin studded with large chunks of chocolate sandwich cookies throughout.  If you like Oreos (or Joe Joe’s!) and are looking for a fun recipe to try with them, these muffins are for you.    While Oreo muffins are not something that I would make every day, after making the crust for my Lighter Chocolate Cheesecake Bars, I found myself with leftover Oreos (if there is such a thing).  Why not try something new for a change!  Oreo Cookies and Cream Muffins are glorious and definitely something worth trying if you’re a cookies and cream lover, like myself!

Oreo Cookies and Cream Muffins
 
Yields: 12 muffins
Ingredients
  • 1¾ cups all-purpose flour
  • ¼ cup granulated sugar
  • 1 tablespoon baking powder
  • ⅓ cup cold butter, cut into 12 pieces
  • 1 cup milk (I used skim)
  • 1 egg
  • 1 teaspoon vanilla extract
  • 16 Oreo cookies, chopped
  • Topping:
  • 3 tablespoons all-purpose flour
  • 3 tablespoons granulated sugar
  • 5 Oreo cookies, finely crushed
  • 2 tablespoons cold butter
Instructions
  1. Preheat oven to 400 degrees. In a standard muffin tin, line 12 muffin cups (or spray with cooking spray) and set aside.
  2. Make topping: In food processor, combine flour, sugar and crushed cookies until combined. Add cold butter, pulsing until crumbly. Put in a small bowl and set aside.
  3. Make muffin: In a food processor, put flour, sugar and baking powder and process until combined. Add cold butter, and pulse until mixture resembles coarse crumbs. Pour into large bowl.
  4. In a medium bowl, whisk milk, egg and vanilla. Add to dry ingredients, mixing until just combined. Gently fold in chopped cookies.
  5. Divide batter evenly among prepared muffin cups. Sprinkle with topping. Bake for 15 to 18 minutes, or until a toothpick inserted in the center comes out clean. Cool muffins in pan for 5 minutes and then move to a wire rack to cool completely.
Notes
Source: Taste of Home


Chewy M&M Sugar Cookies | alidaskitchen.com

Chewy M&M Sugar Cookies

 Chewy M&M Sugar Cookies add M&M chocolate candies to the best chewy sugar cookie recipe, resulting in one of my favorite cookies of all time. These are also fun for holidays!
Chewy M&M Sugar Cookies | alidaskitchen.com

When I first saw a recipe for Chewy M&M Sugar Cookies, and realized it used the same base recipe as my Chewy Sugar Cookies I knew they were going to be good.  Since those cookies are one of my favorites of all time, I figured M&Ms could only make them better, right?  Right!  The sugar cookie base is deliciously chewy and the cream cheese adds a little tang. Chocolate bursts of M&Ms are studded throughout. Chewy sugar cookies made with M&Ms. Genius idea.

I love how cute these look and that they can be made festive for any occasion.  Truth be told, I have been trying to make these cookies for months. I have M&Ms for every holiday stocked in my treat drawer that were intended to be used for Chewy M&M Sugar Cookies.  While I used Easter “Bunny Mix” M&Ms, these are made in honor of Spring (since there won’t be any left for Easter…Oops!).

Chewy M&M Sugar Cookies | alidaskitchen.com

Chewy M&M Sugar Cookies
 
Yields: 24 cookies
Ingredients
  • 2¼ cups all-purpose flour
  • 1 teaspoon baking powder
  • ½ teaspoon baking soda
  • ½ teaspoon salt
  • 1½ cups sugar, plus ⅓ cup for rolling
  • 2 ounces cream cheese, cut into 12 pieces (I used ⅓ less fat cream cheese)
  • 6 tablespoons unsalted butter, melted and hot
  • ⅓ cup canola oil
  • 1 large egg
  • 1 tablespoon milk (I used skim)
  • 2 teaspoons vanilla extract
  • 1⅓ cup M&M chocolate candies
Instructions
  1. Preheat oven to 350 degrees. Line 2 large baking sheets with parchment paper. Place ⅓ cup sugar in a shallow bowl and set aside (this will be used for rolling).
  2. In a medium bowl, whick the flour, baking powder, baking soda and salt. Set aside.
  3. In a large bowl, add 1½ cups sugar and cream cheese. Pour butter over sugar and cream cheese and whisk to combine (some small lumps may remain). Whisk in oil until incorporated. Add egg, milk and vanilla; continue to whisk until smooth.
  4. Add flour mixture and mix with rubber spatula. Add 1 cup of M&Ms and continue mixing until dough forms.
  5. Divide dough into 24 equal pieces. Using hands, roll dough into balls. Roll balls in reserved sugar to coat and place on prepared baking sheets, 12 balls per sheet. Using bottom of drinking glass, flatten balls until 2 inches in diameter. Using remaining M&Ms, gently press 2-3 candies onto tops of cookies.
  6. Bake 1 tray at a time until edges are set and beginning to brown, about 9 to 12 minutes. Let cookies cool on sheets for 5 minutes. Transfer cookies to wire rack and let cool completely before serving.

Source:  as seen on Carrie’s Sweet Life, originally fromTracey’s Culinary Adventures

Chewy M&M Sugar Cookies | alidaskitchen.com

Healthy Banana Cookies - vegan, no added sugar and nut free | alidaskitchen.com

Healthy Banana Cookies

Healthy Banana Cookies - vegan, no added sugar and nut free | alidaskitchen.com
 Healthy Banana Cookies are a chewy, fruit-filled cookie made using some of my favorite foods – oats, dates and bananas.  They are made from simple, wholesome ingredients, have no butter and added sugar, thus making them a healthier choice.  I love the simplicity of these cookies and have to admit these cookies made a delightful breakfast!  These Healthy Banana Cookies also happen to be dairy free and can be gluten free.
Healthy Banana Cookies from Alida's Kitchen

I have had this at the top of my ‘to make’ pile for months just waiting for some super ripe bananas.   While we always have plenty of super ripe bananas in the house, they’re typically reserved for Pumpkin Banana Muffins or Pumpkin Banana Pancakes (or Strawberry Banana Pancakes once strawberry season hits).  Fortunately, I was a muffin and pancake making machine in advance of our new baby’s arrival, stocking the freezer full of Adam’s favorite banana goodies.  With a stocked freezer and 3 very ripe bananas, it was finally my opportunity to try these Healthy Banana Cookies!

Healthy Banana Cookies | alidaskitchen.com
Healthy Banana Cookies
 
Yields: approx. 24 cookies
Ingredients
  • 3 very ripe bananas
  • 2 cups rolled oats (old-fashioned or quick cooking work fine)
  • 1 cup (8 ounces) pitted dates, chopped
  • ⅓ cup canola oil
  • 1 teaspoon vanilla extract
  • 1 teaspoon cinnamon
Instructions
  1. Preheat oven to 350 degrees. Line cookie sheets with parchment paper and set aside.
  2. In a large bowl, mash bananas. Add oats, dates, oil, vanilla and cinnamon, and mix well. Let sit for 15 minutes.
  3. Drop dough by rounded teaspoonful onto prepared cookie sheets. [Note: the cookies don't spread so you may want to shape them a bit]
  4. Bake cookies for 20 minutes, or until they are golden brown. Let cool on cookie sheet for 5 minutes and then move to a wire rack to cool completely.
Notes
These are best enjoyed the day after baking.
healthy banana cookies vegan dates oats

Coincidentally, this is also the first month of the Eating the Alphabet Healthy Recipe Challenge for 2013, hosted by Brenda of Meal Planning Magic.  Each month, several bloggers will focus on healthy recipes featuring fruits, vegetables grains or legumes, from a couple different letters (this month it is A or B).  I thought Healthy Banana Cookies would be the perfect healthy recipe to start off this fun series.

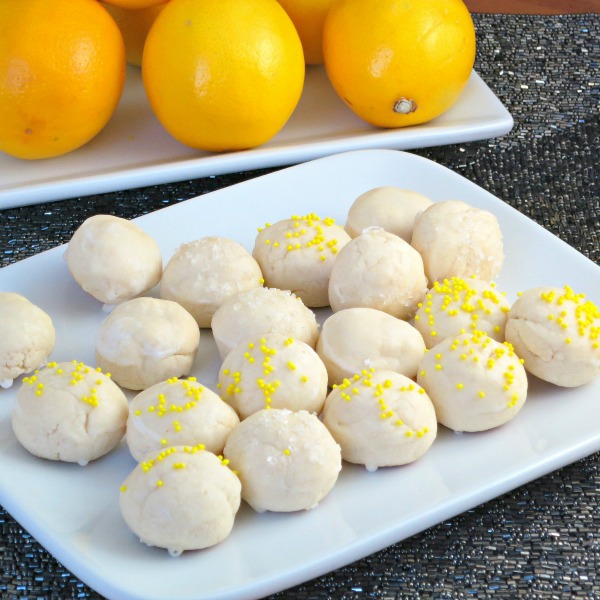
cream cheese cookies with lemon glaze

Cream Cheese Meltaways

cream cheese meltaways with lemon glaze

Cream Cheese Meltaways with Lemon Glaze are little bite-sized cookies that are a light and delicious addition to any holiday cookie platter.  These cookies were a new addition this year, and they were an instant favorite!  The lemon glaze gives just a hint of lemony sweetness to the cream cheesy butter cookies.  The recipe for glaze makes plenty.  You could probably get by with using half the glaze recipe, or better yet – double the cookie recipe…these will go fast!

Cream Cheese Meltaways
 
Yields: 36 cookies
Ingredients
  • 1¼ cups all-purpose flour
  • ½ cup cornstarch
  • ⅛ teaspoon salt
  • 1 cup powdered sugar
  • ½ cup butter, softened (I used light butter)
  • 2 ounces block-style Neufachtel cream cheese (1/3 less fat/light)
  • 1 teaspoon vanilla
  • Glaze:
  • 1¾ cups powdered sugar
  • ¼ cup fresh lemon juice
  • assorted sprinkles, for decorating (optional)
Instructions
  1. Preheat oven to 375 degrees. Line cookie sheets with parchment paper and set aside.
  2. In a medium bowl, whisk flour, cornstarch and salt until combined.
  3. In a large bowl, add powdered sugar, butter, cream cheese and vanilla and beat at medium speed until light and fluffy.
  4. Add flour mixture to butter mixture, stirring until combined. (Note: dough will be dry and crumbly).
  5. Shape dough into 1-inch balls (be careful not to overwork dough) and place on prepared cookie sheets.
  6. Bake for 8 to 10 minutes, or until bottoms of cookies are lightly browned. Cool 5 minutes of pan and then move to wire rack to cool completely.
  7. GLAZE: In a medium bowl, whisk powdered sugar and lemon juice until smooth. Dip the tops of cooled cookies into glaze and place on wire rack. Decorate with sprinkles, as desired. Let cookies stand until glaze is set.

Source:  Cooking Light

cream cheese meltaways from Alida's Kitchen

Chewy Ginger Cookies

Chewy Ginger Cookies

Chewy Ginger Cookies

This is my favorite recipe for Chewy Ginger Cookies. They are soft, chewy, with warm flavors of ginger and molasses, plus they take 10 minutes to prepare!

When it comes to holiday baking, I enjoy trying new recipes, but I also like to have some go-to recipes.   Standby recipes that are guaranteed to be crowd pleasers and are easy to make.  For years, I have been trying to find that special recipe for a ginger cookies.  These Chewy Ginger Cookies are the top contender for becoming that special recipe.  They are super soft and chewy with the warm flavors of ginger and molasses in each bite.   The dough takes less than 10 minutes to make, which is always a bonus!

This marks the final week of the 12 Weeks of Christmas Treats hosted by Meal Planning Mom.  Be sure to check out the thumbnails at the bottom of this post for more delicious holiday treats!

Chewy Ginger Cookies
 
Yields: 30 cookies
Ingredients
  • ½ cup butter, softened
  • ½ cup granulated sugar
  • 2 cups all-purpose flour
  • ½ teaspoon baking soda
  • ½ teaspoon ground ginger
  • ¼ teaspoon cinnamon
  • ¼ teaspoon salt
  • ½ cup molasses
  • ¼ cup water
  • Additional sugar, for rolling
Instructions
  1. In a medium bowl, whisk together flour, baking soda, ginger, cinnamon and salt.
  2. Mix molasses and water in a liquid measuring cup, and stir until combined (Note: you may need to stir again before adding to butter mixture).
  3. In a large bowl, cream butter and sugar until combined. Beating on low, alternately add flour mixture and molasses mixture to the butter mixture, until fully combined. Refrigerate for at least 2 hours to overnight.
  4. Preheat oven to 350 degrees. Line cookie sheets with parchment paper and set aside.
  5. Roll a rounded tablespoonful of dough into a ball and then roll the ball in granulated sugar. Place on prepared baking sheet. Bake for 12 to 14 minutes or until edges are set (be careful not to overbake). Remove to wire rack to cool completely.

Slightly adapted from Taste of Home: Best Loved Cookies and Bars


We are to Week #12 of the 12 Weeks of Christmas Treats hosted by Meal Planning Magic. Be sure to check out all the other bloggers who are participating this week in the 12 Weeks of Christmas Treats blog hop.


Peppermint Twist Kiss Cookies

 Peppermint Twist Kiss Cookies are a fun variation of the ever-popular “blossom” cookies with a candy kiss in the middle. These light-tasting peppermint cookies have a red and white swirl that are cute and festive for the holidays or any time! 
Peppermint Twist Kiss Cookies | alidaskitchen.com
Peppermint Twist Kiss Cookies are tasty, fun and festive…perfect for this time of year!  The red and white cookie is a light-tasting peppermint butter cookie, and then topped with a chocolate kiss.

Sunny Blossoms

Sunny Blossoms are a peanut-free twist on the classic cookie.  While Peanut Blossoms are always a favorite, the need for peanut-free treats are becoming more common.  So in an effort to make a peanut-free alternative, enter Sunny Blossoms, made with sunflower seed butter instead of peanut butter.  I used my grandma’s recipe as a base and went from there.  Being the peanut butter diehard that I am, I wasn’t sure what to expect.  While it is obviously not peanut butter, they still taste really good!  Mike loved them as well and noted the next day they tasted almost peanut-y.  Sunflower seed butter is mild enough to not overpower the cookie.  Frankly if you put chocolate with anything, it’s going to be good! 🙂

Time sure flies!  We are to Week 7 of the 12 Weeks of Christmas Treats!  We all know that no holiday cookie platter is complete without some form of a ‘blossom’ cookie.  Not only are they tasty, but they are so darn cute with the Hershey’s Kiss in the middle!  Sunny Blossoms offer a delicious, peanut-free alternative.

Sunny Blossoms
 
Yields: approximately 36 cookies
Ingredients
  • 1¾ cups all-purpose flour
  • 1 teaspoon baking soda
  • ½ teaspoon salt
  • ½ cup (1 stick) butter (I used light butter)
  • ⅓ cup sunflower seed butter
  • ½ cup granulated sugar
  • ½ cup packed brown sugar
  • 1 egg
  • 1 teaspoon vanilla
  • granulated sugar, for rolling
  • 36 chocolate Hershey's Kisses, unwrapped
Instructions
  1. In a small bowl, whisk flour, baking and salt. Set aside.
  2. In a large bowl, using an electric mixer, cream together butter and sunflower butter until blended.
  3. Gradually add granulated sugar and brown sugar to sunflower butter mixture - cream well. Add egg and vanilla - beat well.
  4. Blend in dry ingredients gradually (Note: I do this step by hand using a wooden spoon) and mix thoroughly. Chill dough in the refrigerator for at least 2 hours (Note: I typically chill overnight).
  5. Preheat oven to 375 degrees. Line baking sheets with parchment paper.
  6. Shape dough into balls using a rounded teaspoonful for each. Roll balls in granulated sugar and place on baking sheet.
  7. Bake for 8 minutes. Remove from oven. Top each cookie with a Hershey's Kiss candy, pressing down firmly so cookie cracks around edge. Return to oven and bake 2 to 5 minutes longer until golden brown. Move cookies to wire rack to cool completely.


Easy Chocolate Sandwich Cookies

cake mix homemade oreo cookies with cream cheese filling

Easy Chocolate Sandwich Cookies are a simplified version of a chewy homemade Oreo cookie.  The chocolate cookies are soft, yet sturdy and the filling is a sweetened cream cheese frosting.  The dough literally took me 5 minutes minutes to whip together.  I feared the dough would be gooey and messy to work with, but it was quite firm and rolled into balls by hand without a huge sticky mess.

These cookies are fun any holiday or celebration because you can color the filling to suit any occasion or simply roll the sides in sprinkles for a cute, colorful decoration.  The recipe yields a generous amount of cookies, which is perfect if you’re looking to share.  It also halves easily, which is what I did…(I still shared though) 🙂

I am sharing these delicious yet super easy cookies as part of Week 4 of the 12 Weeks of Christmas Treats, hosted by Meal Planning Magic.  While this recipe makes plenty and these cookies are perfect for any holiday cookie platter, I made them pink in honor of Breast Cancer Awareness Week hosted by Erin of Dinners, Dishes and DessertsTo conclude Breast Cancer Awareness Week, tomorrow Erin is hosting a giveaway, so be sure to visit Dinners, Dishes and Desserts on Friday for a chance to win!

Be sure to check out the thumbnails at the bottom of this post and visit the other bloggers who are posting amazing recipes today in support of Breast Cancer Awareness, and also for the 12 Weeks of Christmas Treats!

Easy Chocolate Sandwich Cookies
 
Yields: approximately 4 dozen sandwich cookies
Ingredients
  • 2 packages devil's food cake mix
  • 4 eggs, lightly beaten
  • ⅔ cup vegetable oil
  • 1 package (8 ounces) cream cheese, softened - (I used Neufachtel / ⅓ less fat)
  • 3 to 4 cups powdered sugar
  • 1 teaspoon vanilla extract
  • food coloring or sprinkles for decorating, if desired
Instructions
  1. Preheat oven to 350 degrees. Line cookie sheets with parchment paper and set aside.
  2. In a large mixing bowl, beat cake mixes, eggs and oil until combined (Note: I used a hand mixer; batter will be very stiff).
  3. Roll dough into 1-inch balls and place on prepared baking sheet. Using the side of a silicone spatula, press to flatten the balls slightly.
  4. Bake for 8 to 10 minutes. Remove to a wire rack to cool completely before filling. (Note: I baked the cookies the night before and did the filling the next day).
  5. For the filling: In a medium mixing bowl, beat cream cheese, powdered sugar and vanilla extract until smooth. Add food coloring, if desired.
  6. Spread filling on bottom of half of the cookies. Top with remaining cookies. Finish decorating, as desired.

Source:  Taste of Home: Best Loved Cookies and Bars

Be sure to check out the bloggers who are supporting Breast Cancer Awareness Week for some delicious pink and/or healthy recipes! 

Be sure to check out all the other bloggers who are participating this week in the 12 Weeks of Christmas Treats blog hop. And if you’re a blogger and want to join in on the fun, check out this post for the form to fill out to start baking along with us

Pumpkin White Chocolate Chip Cookies

Pumpkin White Chocolate Chip Cookies from Alida's Kitchen

Every time I drop Adam off at Preschool, he asks what I’m going to do while he’s at school.  Last week I told him laundry and other boring things.  He told me I should make something…I should make something with pumpkin.  Little did he know, I had these Pumpkin White Chocolate Chip Cookies on my list of things to do, so easy enough.  I told him I would make some pumpkin cookies, and he just beamed!  That definitely sounds better than laundry 🙂

These Pumpkin White Chocolate Chips cookies are very soft with a little chewy bite from the oats.  I changed up the sugar ratio a bit from the original recipe because I love what brown sugar does to baked goods.  The original recipe calls for 1 egg, but I initially made a half recipe.  How do you cut an egg in half?  I used the full egg in half, and 2 in a full recipe.  The dough is a little gooey, so it helps to refrigerate it a bit before baking.    Otherwise I don’t know exactly how this impacts the recipe, but I do know these cookies are perfection and would not change a thing.

I am sharing these delightful cookies for week 3 of the 12 Weeks of Christmas Treats, hosted by Meal Planning Magic.  While these cookies are perfect for any holiday cookie platter, I do think they would also make an excellent Halloween or Thanksgiving treat, or any time treat for other fellow pumpkin lovers!  

Pumpkin White Chocolate Chip Cookies
 
Yields: approximately 48 cookies
Ingredients
  • 1 cup butter, softened
  • 1 cup packed brown sugar
  • ½ cup granulated sugar
  • 2 eggs
  • 1 teaspoon vanilla extract
  • 2 cups all-purpose flour
  • 1 cup quick-cooking oats
  • 1 teaspoon baking soda
  • 1 teaspoon pumpkin pie spice
  • 1 teaspoon cinnamon
  • 1 cup canned pumpkin
  • 1½ cups white chocolate chips
Instructions
  1. In a large bowl, cram butter and sugar until light and fluffy. Beat in egg and vanilla.
  2. In a separate bowl, combine flour, oats, baking soda, pumpkin pie spice and cinnamon.
  3. Stir in flour mixture into butter mixture alternately with pumpkin. Fold in white chocolate chips.
  4. Refrigerate dough for 30 minutes to overnight.
  5. Preheat oven to 350 degrees. Line cookie sheet(s) with parchment paper.
  6. Drop dough by tablespoonfuls onto prepared baking sheets and bake for 12 to 13 minutes, or until lightly browned. Remove to wire racks to cool completely.

Adapted from Taste of Home

If you’re a blogger and want to join in on the fun, check out this post for the form to fill out to start baking along with us!

peanut butter peanut butter chip chocolate chewy cookies

Double Peanut Butter Chocolate Chewies

peanut butter peanut butter chip chocolate chewy cookies
I don’t even know where to begin about these cookies. They have the peanut butter and chocolate combination, which we all know and love. But these Double Peanut Butter Chocolate Chewies are truly not any ordinary chocolate and peanut butter cookie. They are amazingly chewy, without being cakey. They have a delicious balance of peanut butter and chocolate. These cookies are made without any butter and have yogurt and oats to add some wholesome goodness (dare I suggest this makes them fit for breakfast?)

A couple tips:  When flattening the cookies before baking, keep in mind they will spread.  Just flatten them a little bit and you will be fine.  Keep an eye on the bake time, because over baking the cookies will result in a less chewy cookie.  I baked mine for 8 minutes and that was perfect with my oven…but definitely keep an eye on them.

Double Peanut Butter Chocolate Chewies
 
Yields: 36 cookies
Ingredients
  • 1 cup chunky natural peanut butter
  • ¼ cup canola oil
  • ½ cup packed dark brown sugar
  • ½ cup granulated sugar
  • 2 eggs
  • 3 tablespoons nonfat plain Greek yogurt
  • 1 tablespoon vanilla extract
  • ¾ cup all-purpose flour
  • ⅓ cup unsweetened cocoa powder
  • ¼ cup rolled oats (I used quick oats)
  • 1 teaspoon baking soda
  • ½ teaspoon salt
  • ¼ cup semi-sweet chocolate chips
  • ¼ cup peanut butter chips
  • ¼ cup turbinado sugar
Instructions
  1. Preheat oven to 350 degrees. Line cookie sheets with parchment paper and set aside.
  2. In a medium bowl, whisk flour, cocoa, oats, baking soda and salt. Set aside.
  3. In a large bowl, beat peanut butter, oil, brown sugar and granulated sugar on medium speed until blended. Beat in eggs, yogurt and vanilla until combined.
  4. Gradually add flour mixture to the peanut butter mixture, stirring until blended. Stir in chocolate and peanut butter chips.
  5. On prepared cookie sheets, place rounded tablespoonfuls of dough 2 inches apart.
  6. Dip the bottom of a class in water, and then dip the class in turbinado sugar. Using the sugared glass, flatten the dough slightly, leaving a thin layer of sugar on top. Re-wet glass, as needed.
  7. Bake cookies for 8 to 10 minutes (be sure not to over bake!). Cool on baking sheet for 5 minutes before transferring to a wire rack to cool completely.

Barely adapted from Eating Well